Showing posts with label S-10. Show all posts

Wednesday, September 17, 2008

EV-Steve's S-10 update; it's now rear wheel drive only

In our last episode, Super-Dave came over and helped me get the front axles out, remember? We weren't done.
-
EV-Steve helpfully reminded me to reinstall the outer axle stubs to support the inner bearing races. I disassembled the outer CV joints of the axles and reinstalled the outer axle stubs. Pretty easy.
What was not easy was getting the front differential out. After a few hours disassembly and fighting sometimes nearly inaccessible rusty bolts (you were correct again, Steve) it became clear that the differential was put in the chassis from the top side, before the engine would have been put in above it. It was like one of those bent nail puzzles where you keep rotating the parts, but you can't get them apart because something is always in the way. Bottom line: it was not going to come out the bottom easily. A quick poof-poof of one little bracket with the torch and it fell out. Yes, I not only got a nice new torch tip, I got a spare one as well.
-
I put the unneeded parts on the digital scale I bought for weighing packages right before I stopped ebaying stuff, and the grand total was 95+ lbs. With gear oil, fasteners, cut-off brackets, and rust flakes, call it 100 lbs even. Doesn't sound like much, but in EV's as in drag racing, every little bit of weight removed helps.

Sunday, September 14, 2008

EV-Steve's S-10 gets saved by Dave

Sorry for so long between posts, hot rod fans. I had my father-in-law and his wife as guests from Florida last week, so we spent a lot of time with them, and I did little else. Also I have had a headache for four days now, so that can't be good. Yes, I'll call the doctor first thing tomorrow, if I make it.
I have been doing a little more work on EV-Steve's S-10, but frankly I have not been giving it the priority it deserves, so thanks for your patience, Steve. I am trying to get the front wheel drive parts off, since they are not used, to save weight. I have had one side partly apart for awhile now, but I just didn't know how to finish this job. I have never done independent front axles before. My brother Dave came over to help me this evening. And when I say help, I mean he did the whole thing himself, despite my protests. He jumped right in and got filthy, while I ran tools to him. I was trying to take photos and notes, so I'd know how to do the other side, but he worked like lightning. I literally could not take notes fast enough. Dave has been a professional mechanic all his life, probably 25+ years, and you can tell. He works for a major luxury car dealer. Yes, I had it mostly apart, but watching him finish this thing with speed and confidence, was like watching a magician. Tools are going zip zip, and things get disconnected, and parts are flying off, and before you know it, he's done. He has this amazing trick to getting ball joints off that literally happens so fast you can't see it. It would take me 10 minutes to get my ball joint press set up and working. He just whacks the spindle casting with a big hammer, tap, tap, WHACK! and the ball joint pops off that fast.
Here's my cousin Pete, fellow drag racer and all around good guy, holding the passenger side axle. Yes, it's heavy, so this is all going to be worth the trouble.

Here's Dave, head down and working. No gabbing, just work. I must also say that this afternoon was probably one of the most humid days I have ever felt. I mean it was brutal! I felt so bad for Dave. I positioned a big box fan to blow right on him, and got him cold drinks, but it was just so humid out, he must have felt like he was in a jungle. Fixing a truck.

My nephew Tyler, Dave's youngest son, was able to keep cool though.

If you look close, you can see one of the many sweat beads ready to drip off the end of Dave's nose. He never complains either. He is one tough dude. My head is still pounding, so I try not to complain either. Hope it doesn't asplode.
With one side done, he decides to do the driver's side too. Probably didn't want to see me taking another five weeks on that side. Only problem was, I had already returned the 36mm socket I had borrowed from him previously. There was no way we could get it, or a new one, this late on a Sunday. We decide to torch the axle nut off. Unfortunately, my torch tip is fubar, and I had meant to replace it, because it doesn't work right. Poor Dave spent so much time trying to get the POS torch to work. Patience of a saint.
We further decide to cut this side axle shaft in two, so we can just pull the parts out without so much disassembly. A little grindy-grinding, and the shaft is in two. Both parts come out with little effort. See, I would never think to do it that way. Very crafty.
Here is the pass side with the axle shaft out, before complete reassembly. It used to connect from the circular flange in the upper right (see the threaded holes), to the hub on the left, where the wheel studs are. Kind of hard to describe something that's not there, but it is cool and weird to see the big 'ol axle BOOYAH! out of there.

Here's the driver's side axle cut in two and out. Don't worry Steve, we won't be needing that anymore. I'm pretty sure.
Next I'll go for the front differential and front driveshaft. I have preliminarily looked them over and that part looks pretty straightforward. Hopefully.
Well, I hope that I have adequately conveyed my admiration and appreciation, my love really, for my brother Dave. And I am not just saying that because he always helps me out with my car problems. But he always does. I often think of him and hope he does not remember the times when we were kids, that I may have taken advantage of the fact that I am three years older than him, as kids are apt to do. Anyway, I love him dearly, but he's not the kind of guy you just say that to, so I said it here.
Thanks, Dave.

Saturday, August 9, 2008

More work on EV-Steve's S-10

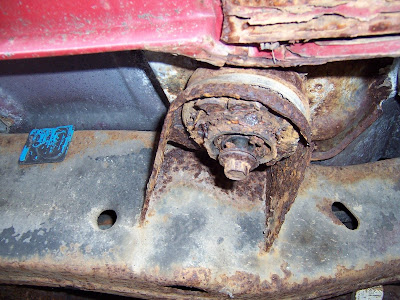
I redid the passenger-side frame mount on EV-Steve's S-10. This was in somewhat better shape than the first one I did, but it was still pretty bad. Before, above.

After. The paint is still wet, makes it look kinda bad somehow. It actually came out as well as the first one, although the experience of having done this before did not translate into any time savings on the second one, as I had hoped.
Keep moving, not much to see here.


Quickie tool tech:
To drill the opening in the floor and get at the nut-plate, I had to lift the interior floor matting. But first, I had to get the door-sill molding off. This can be a difficult task on any car older than a couple of minutes. The screws that secure these are exposed to moisture and road salt from dripping shoes in the winter, and direct outside exposure since they sometimes protrude right through the floor to the underside of the car body. They get dirt and gungo packed into the heads, so it's hard to even get a screwdriver in them.
-
First, insert a phillips screwdriver if they are phillips head, as most are. Whack on the top of the screwdriver to seat the point, and hopefully knock the screw loose from it's rust. This works for many. Oh yes, use a rust-lube spray on them too.
For the stubborn ones, get an Impact Driver like the one I have here. This ingenious tool is like a combination screwdriver, ratchet, and chisel. This is designed to be hammer-whacked. Seat it in the screw head like so. Whack it HARD with a hammer. No, a bigger hammer. And hard! When you whack this tool, there is a mechanism inside that twists the tip as it is hit, so the twisting torque is delivered at the exact moment that it is being pounded into the screw head by the hammer blow. Ingenious, right? This gets most of the tougher ones.
-
I had to actually go in from the side with a chisel and knock the head off of one that refused to loosen. Sometimes brute force is all these guys understand.
-
See ya soon. JK

Wednesday, July 23, 2008

Some work on EV-Steve's EV

My friend EV-Steve was kind enough to give me some work doing some mechanical fixing on his EV. It is a 1985 Chevy S10 that was converted to electric by a college as an engineering project, and he bought it sometime afterwards. I have been enjoying working on it for him. I have an affection for these little S10's, as I owned one for 12 years and 219,000 miles.Here's my little tip for today: Sometimes I like to set up my little doctor's operating-tool table. It's just a scrap of plywood set on a stand. I use this to set my tools on while I'm working. As I fetch tools from my toolbox in the rear of the garage, I put them on this table so they are handy, yet out of the way. I stand between the car and the table, so I just have to turn around to get what I need. You can lay parts, supplies, or whatever, on the table. On this piece of wood I even have some numbers markered on as notes from some other project.
-
This is WAY better than the lay-the-tools-on-the-car-as-you-work method. I hate doing that. Yes I eventually have 50% of my tools out on the table, but it's still the 50% I need.
-
I redid most of the brake system so far on this truck. Another project I did was to replace the alternator. I had to take some electrical components out to get to it, but it wasn't so bad. Not the worst I have ever done. In this view, you are looking into the "engine" compartment (now motor compartment) from the front of the truck. There is a set of 4 batteries up front.

Behind the batteries is the main component board, lifted up slightly here. You can see the body of the electric motor, it has a slight coating of rust on the outside of the case. As a point of reference, the brake booster and master cylinder are at top right, in their stock positions.
-
I do dig working on this thing. The familiarity of the S-10, and the coolness of the EV. It'll be here for a while, so if anyone wants the 5c tour, come on over and check it out.
-
Talk to you soon.


Friday, July 18, 2008

Tech- Give yourself a brake

See, I said brake, because I'm talking about hydraulic brake systems, not giving yourself a break, as in: "to relax"...so brake here is the...um, that is, it's like a different meaning than the ah.....(sound of crickets chirping)......ooooo-kay.
Sorry for the late post, HRitHV fans, I got a one-time side job this week, so I had to take it.
-
This is EV-Steve's S10 EV conversion, an '85 model that's been laid up a while. He asked me to go through the brake system and get it up to snuff. The 3 large white boxes contain some of the batteries that power the truck. He runs 120 volts now; 20 6-volt batteries.
-
His truck needed some brake parts replaced, and some hard lines replaced as well. The hard lines get rusty eventually and leak. Replacing hard lines on an assembled vehicle can be a challenge. It's part tough work, and part art form, really. The factory puts them on way before anything else is in the way; actually before the body is on the frame. The ones for this truck were relatively easy, because the whole bed tilts up as shown. Nice.
-
You can get hard lines at any auto parts store, they look like this, if your eyesight is bad:
They come in 10-inch incremental lengths, and there are coupling nuts to make really long runs. The nice thing is they already have "double flared" ends on them. You need double flared ends to withstand the pressure in a hydraulic brake system. This pressure can average 2000 psi.
-
Here are some of the lines I did on EV-Steve's truck. You can see the sweeping bends and how you must go around obstacles. The brake hose is new as well. The whole system must be good to work properly.
To make the lines really nicey-nice, you sometimes have to shorten the length to make them fit well. If you doubt your abilities, you can just make a sweeping loop with the extra length. This way you don't have to make a new double flared end after cutting, which requires special tools and some experience, or at least practice. If you make a leaky new end, you are no better off than before.
-
I personally could not bear having the too-long lines on there. In my view it is bad workmanship and therfore unacceptable. I was not satisfied with the look of the lines I did, so I cut them shorter, and made new double flared ends. Now they are the correct length, and they look great and function perfectly.
Sometimes the fittings will leak. This is especially prone to happen on any double flared ends you make. Get out your line-wrench (you do remember I taught you about these special wrenches, right?) and give the fitting a good tightening. There. Still leaks don't it? Frustrating. No no no, don't just crank on it more, you'll strip it!!! Jeez. You want to make another flare, but then the line will be too short, huh? Forget that.
-
Here's the tricky-trick secret to all of this (aren't you glad you stuck around for the tricky-trick secret? I knew you would be): Loosen the fitting, then tighten it again. Repeat. Repeat again. Notice that every time, the fitting will tighten a little more than before, with less effort. This is the flare bedding in. Keep doing this until the leak stops. Yes, it will.
-
Now just bleed the brakes, and stop confidently and safely.
-
I have a good carburetor story from the F100 coming up. Hopefully we can get that running soon. Thanks for tuning in.

Wednesday, April 30, 2008

Radical change of plans...maybe

A big part of the process is the planning. I like musing over possiblities in my mind, anticipating problems, formulating solutions, etc. To me that is part of the fun, really. Don't cost anything to change things in my mind. Nonetheless, I like to have a pretty solid plan in place before I even begin a project; have all the steps figured out, all the parts sourced, and costs estimated. I have about 6 solid pages of notes already for this project. It is disruptive and costly to make big changes in mid-stream. Even worse, a project can lose it's way, and become a jumble of half-baked, unrelated ideas and themes. Of course, this is balanced by the need to be flexible and open to new ideas as they present themselves.

I had originally intended to pull the gas motor from the truck, install the electrical components, and that would basically be it. Done. Truck.

But: I have already planned to replace the bed with a fabricated aluminum box to hold the batteries. A 1-piece fiberglass front end would actually be easier to install (and lighter) then to rebuild the front end sheet metal. The trans I hoped to keep in it doesn't look like a good candidate. I want to do a power disc front brake rebuild, so most of the front suspension would not be reused. The rearend is useable, but is 50+ years old, and has the funky (stock) 5 x 5-1/2" bolt pattern hubs. The wheels and tires, which I love, because they are totally period-perfect, are probably too wide and will have a lot of rolling resistance, which is not good.

I am sourcing an S-10 or Ranger for a manual trans to use. Might as well swap in the newer rearend as well. And driveshaft. Somehow using the newer front suspension would be an easy way to get discs and a matching wheel bolt pattern.

So what does all this mean? I am considering doing a full frame swap. WAY more radical than I planned: Get an S-10, rebuild the chassis. Keep the S-10 manual trans, driveshaft, and rearend. Put the F100 cab on it. Install fiberglass front end, and aluminum bed/battery box. New lighter wheels and skinnier tires.

The downside is I would be really only using the cab of the F100, and for what it cost, that seems like a wasteful thing to do. But if I parted out the remainder of the F100, I could probably make back most of the purchase price. These parts are in NICE shape, and hard to find up here.

The good side is that the truck will be much more purpose-built; it would be a better EV. I would probably be time and money ahead in the long run. I have to find some dimensions of S-10 frames and think more about this.
-
photo: Ford Motor Co.