Showing posts with label brakes. Show all posts

Sunday, May 31, 2009

Brake rebuild, new 30 year old mirror

I have been pretty busy doing work on the '58. The brake master cylinder was leaking real bad when I got the car. So basically, no brakes. I have been weighing lots of options for repairing this, most of them centered around upgrading the brake system as well. I was pretty set on going for a brand new front disc brake conversion with a power boosted dual master cylinder. This would be a really fantastic upgrade, but it would run about $500. My last $500. I was about to settle on a new stock master cylinder ($100) when I found a rebuild kit for only $20! This is the stock master cylinder, rebuilt at home. I disassembled the unit, cleaned it thoroughly, and honed out the bore. I found that the compensating port (sort of a bypass port) was completely clogged and the bore was filled with gooky gunk. I assembled it with new parts, filled it with new fluid, and bled the air out. So far, so good; no leaks. I mounted it back on the car without even repainting it. Two things:
1. People, you can put all the teflon tape you like on the threads of the main brake line fitting (that's it there coming out and going to the right) but THIS WILL DO NOTHING. Brake lines seal by the compression of the cone on the line sealing against a conical seat. The fitting's threads just provide the force to accomplish this, they do not seal anything. This is not house plumbing. The previous owner clearly did not know this.
2. Normally bleeding brakes involves forcing fluid all the way through the lines to expel any air.
In this case, since only the MC was leaking, there should be no air anywhere else in the brake system. The only air should be right at this same fitting. I used a trick I learned from my brother Dave. I left this fitting slightly loose, and had an assistant pump the brake pedal. This forced fluid out of the fitting, but it pushed the air out as well. By catching the forced leak with some rags, we were able to bleed the air out right at this fitting, and we did not have to bleed the entire system. This worked great, and the pedal feels rock hard. I think we have brakes.
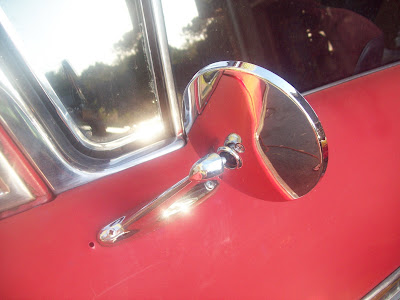
I needed an outside mirror. The reproduction stock ones are expensive, and I'm not sure I like the look of them anyway. I bought this replacement mirror at K-mart about the time I had my first car. I don't know what it was for, since I clearly did not use it on that car. Now I have had it, still in the box, ever since. Didn't think I'd ever use it, so I have dutifully brought it to every swap meet I have ever vended at, and nobody ever bought it, for like five bucks. It must be destiny, so I dug it out and installed it, a brand new, 30 year old, five dollar, K-mart mirror. See, you cannot buy that fun kind of history if you buy a car that already has the mirror on it. I like it. Oh, the extra hole was already there.
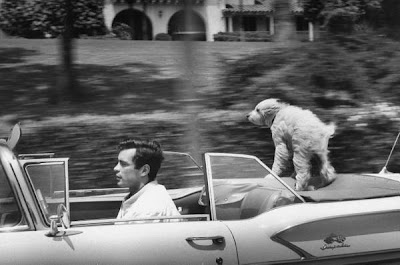

Finally, for no reason, I'll show you this pic of a dog taking a ride on a '58 Impala convertible. Photo: The HAMB, of course.

Wednesday, September 3, 2008

Some poking around on the '58, pt. 1

I did some poking around on the '58 last weekend. First thing I did was to pull this awful front bench seat out. It is not a '58 seat, it doesn't fit right, it's too low, and it's in just awful condition. Wasn't even bolted down. I now believe it is a 1964 Chevy front seat (there was an ID tag underneath), so that makes it perhaps valuable to someone. If you want it, or know someone that does, come get it by this Saturday. It's loaded in my truck to go to the dump. Do I feel bad about trashing a 34 year old seat? Yeah, I guess, kind of, but I'm not in the mood to bother to sell it, as we know from before, so Hoo-yah, out it goes. Not, as they say, my problem.
-
Oh, yeah, if you want it, it's in excellent condition (forget what I was saying before) and it's fifty bucks.
I have loosely installed the seats from my mom's old Geo that we scrapped. At the last moment I took these seats out merely because they were in such good condition, I had no use for them at the time. I wanted to use the plastic racing bucket seats for drag cars, but they are kind of floppy if the backs are not up against a roll bar, and I'm not planning a roll bar, at least yet. These look kind of modern for what I am planning, but with the headrests off, they don't look too out of place. Plus, they are really light, they have the adjustable seat tracks, they kind of match the red outside paint, they are in great shape, and they are my favorite price: free. So be it.

While sitting in the loosely installed new bucket seat, I noticed a big wet spot on the floor where the driver's feet go. This was not alarming, since the car is outside, and most of the weatherstripping is shot. While wiping it out, I noticed that most of the fresh floor paint was coming loose. The liquid had a faint, familiar smell too. Brake fluid. It's not water, it's brake fluid. Brake fluid is notorious for loosening paint, in fact I have used it as a quickie paint stripper. But how was it getting in the car?

Here is the ancient brake master cylinder in the engine compartment. Probably original. All four brakes are fed from the single line exiting in the lower right. This is a single chamber type cylinder. The problem is, if any part of the brake system leaks, all the brakes fail at once, since all the fluid passages are connected, the fluid will all leak out the one hole. Actually, it's more like you will be unable to build any pressure at any other brake, and you need a lot of pressure for any brake to work. Newer (from the mid-'60's on) systems separate the front and rear brake systems, these use dual-chamber master cylinders. So a leak in the front leaves you rear brakes, and vice-versa.
-
The spark-plug wire retention method is a nice touch. Hope you didn't put too much time into that mod, bro.
-
The previous owner said in his ad, that in his opinion, the entire brake system needs to be rebuilt. So he was basically covering his A. I believe the master cylinder is leaking out the actuating (push) rod in the back, and dripping down the brake pedal, and puddling on the floor. A new master cylinder would cure this, I'll upgrade to a dual-chamber cylinder while I'm at it.


No sense waiting for the rest of the fluid to leak out, so I'm using this hypodermic thingy to suck the remainder of the fluid out. This thing works great. I also have a turkey baster for bigger pools of unwanted fluid. Seriously.


The battery has gone dead, I noticed the PO was leaving it disconnected. Perhaps it has a slow drain. Perhaps it isn't charging. This car has a generator (DC). Oh look, you can just see a little black wire and a little red wire that aren't hooked up to anything. That doesn't seem right. I'll bet they're supposed to go to something. Just a guess. I'll bet if I hooked them up, it might actually charge.
-
I'll pull this thing out, and put in a one-wire alternator and be done with it. One-wire alternators work great.
-
I'll follow up when I get the parts to fix up this stuff. I also broke "poking around" into a second part, since the simple "check the oil" got so unbelievable I have to give it it's own post.
-
I know I do a lot of complaining, and bashing, and sarcastic-talking, when I do these first fix-up things on a vehicle I just got. Maybe that's the "I can't believe what the PO did" factor, but the truth is I really do like doing these fixes, because in just a few weeks, I can get a barely driveable heap into decent shape. Most of it is small stuff; the PO just cheaped out, or didn't want to do the tough work, or just maybe didn't know better. It's almost a fun, detective, archaeologist, Mr. fix-it type of work. And it looks like I have plenty of fun ahead of me with this car.

Friday, July 18, 2008

Tech- Give yourself a brake

See, I said brake, because I'm talking about hydraulic brake systems, not giving yourself a break, as in: "to relax"...so brake here is the...um, that is, it's like a different meaning than the ah.....(sound of crickets chirping)......ooooo-kay.
Sorry for the late post, HRitHV fans, I got a one-time side job this week, so I had to take it.
-
This is EV-Steve's S10 EV conversion, an '85 model that's been laid up a while. He asked me to go through the brake system and get it up to snuff. The 3 large white boxes contain some of the batteries that power the truck. He runs 120 volts now; 20 6-volt batteries.
-
His truck needed some brake parts replaced, and some hard lines replaced as well. The hard lines get rusty eventually and leak. Replacing hard lines on an assembled vehicle can be a challenge. It's part tough work, and part art form, really. The factory puts them on way before anything else is in the way; actually before the body is on the frame. The ones for this truck were relatively easy, because the whole bed tilts up as shown. Nice.
-
You can get hard lines at any auto parts store, they look like this, if your eyesight is bad:
They come in 10-inch incremental lengths, and there are coupling nuts to make really long runs. The nice thing is they already have "double flared" ends on them. You need double flared ends to withstand the pressure in a hydraulic brake system. This pressure can average 2000 psi.
-
Here are some of the lines I did on EV-Steve's truck. You can see the sweeping bends and how you must go around obstacles. The brake hose is new as well. The whole system must be good to work properly.
To make the lines really nicey-nice, you sometimes have to shorten the length to make them fit well. If you doubt your abilities, you can just make a sweeping loop with the extra length. This way you don't have to make a new double flared end after cutting, which requires special tools and some experience, or at least practice. If you make a leaky new end, you are no better off than before.
-
I personally could not bear having the too-long lines on there. In my view it is bad workmanship and therfore unacceptable. I was not satisfied with the look of the lines I did, so I cut them shorter, and made new double flared ends. Now they are the correct length, and they look great and function perfectly.
Sometimes the fittings will leak. This is especially prone to happen on any double flared ends you make. Get out your line-wrench (you do remember I taught you about these special wrenches, right?) and give the fitting a good tightening. There. Still leaks don't it? Frustrating. No no no, don't just crank on it more, you'll strip it!!! Jeez. You want to make another flare, but then the line will be too short, huh? Forget that.
-
Here's the tricky-trick secret to all of this (aren't you glad you stuck around for the tricky-trick secret? I knew you would be): Loosen the fitting, then tighten it again. Repeat. Repeat again. Notice that every time, the fitting will tighten a little more than before, with less effort. This is the flare bedding in. Keep doing this until the leak stops. Yes, it will.
-
Now just bleed the brakes, and stop confidently and safely.
-
I have a good carburetor story from the F100 coming up. Hopefully we can get that running soon. Thanks for tuning in.

Tuesday, June 3, 2008

Removed the ABS valve thing

Here are the brake parts still attached to the chassis. The ABS valve is on the left, master cylinder is in the middle, and power booster on the right. The power booster is what gives you "power" brakes. I'll be removing and discarding the ABS valve. I made a quick sketch of where each line goes from the ABS valve. I don't know why I did this, as I will not be reusing it and will not need this information. Old habit I guess. I make a lot of sketches and notes as I take a vehicle apart. Can't hurt.

No, the car in the background is not falling off a cliff, the picture is a little tilted.

Here I am about to loosen the lines from the ABS module. For disassembling any type of tube fitting, you should use a Line Wrench. This is like an open end wrench, but it wraps farther around the fitting for better grip. Look at how it wraps 3/4 of the way around the fitting instead of 1/2 way like an open end wrench would. This is 2 extra points of the hex it grabs. That matters. This wrench is less likely to slip and strip the hex, and it also prevents crushing the fitting, which can happen if you 'gorilla' them like I do. After you have broken them loose, you can switch to a regular open end wrench for faster work.
-
Line wrenches come in a set of four or so. Get 'em. For every fitting you don't booger up, your brakes will thank you.

Here is the ABS valve, sittin' in the pan like a big fat ripe appendix. I wish I had dumped it at the scrapper, it's got to weigh 20 lbs (the valve, not my appendix). Is this really necessary? Do people really not know how to stop a car to the degree that this thing has to be on there? You should have seen the amount of wiring that was attached to this thing too. Pathetic and ridiculous. Pump and steer, people, pump and steer. Sounds like an ale and steak house, the Pump and Steer.
-
I was considering putting in a combination valve from an earlier model S10 where the ABS valve was. But I am thinking that the brake bias will be permanently different than a stock truck. The estimated 1500 lb battery load will see to that. I think a simple solution will be to put a proportioning valve like that used on race cars on it. All you do is hook up the brakes, front and rears separated, and do a panic stop. Note whether the front or rear wheels lock up (go into a skid) first. Usually it will be the rears, but with the rear load this truck will have, it may be the fronts. Install the proportioning valve in the set that locks up first, and close the valve a little. This restricts the amount of fluid that can pass, delaying that set of brakes from locking up, until they all do at once or more nearly at once. Get it?

Here are the parts we will be reusing, the master cylinder and power booster. Now sitting on the previously mentioned small pile of parts. I believe that is the sun visors it is dripping on there.

A small task, but I have done enough ambitious projects to know that you get them done the way you eat an elephant: One little bite at a time. Plus now you know what a Line Wrench is.

Now I'm hungry.