...I haven't posted much lately, evidence of my waning interest in the blog. I have already resigned from blogging for the Poughkeepsie Journal. That leaves this blog.
-
The original intent of this blog was to chronicle the build of the electric vehicle; a project, in my mind, worthy and interesting enough to blog about. That got cancelled, or at least put on indefinite hiatus, and I moved onto other, more conventional small projects.
-
I now feel that the blog has lost it's way. I don't think it's particularly interesting, or relevant, or worth reading. My continuing unemployment means I don't have the money I would like to spend on car projects. That's a big show-stopper. I am making excellent progress on my impending career change, but that is a long term endeavor.
-
The car projects I have on hand now are long term projects as well. I do want to get back to the electric vehicle project. I still think this project would be the most unusual and interesting project to write about. I am still very enthusiastic about every aspect of it. I have imagined, over and over, what it would be like to actually drive; what the sensations would be, how it would look, the bright sun glinting off of the metallic green paint. A big, fat, pimped out, truck sized golf cart, zipping down the road, the only sound you would hear is the noise from the tires. I still think it is the right thing at the right time. But again, to do this project decently, I expect it would take possibly $20,000, and I just don't have that kind of dough to invest. I think it could be big. It could become a business. I think it could be the next Boyd Coddington, Jesse James, or OCC. But I never was a big financial risk-taker. Jump off a bridge, yes, I've done that, and worse. But financial risks, no, I'll keep my little copper pennies* right here, thanks.
-
So my point is, speaking of having lost it's way, that I don't know if I'll keep on with the blog. We'll see.
-
For what it's worth, I got the shifter done in the '58, and it works great. I also took the '58 out today for it's maiden voyage up the street and back, and, let's just say it needs a bit more work. But it did drive!
-
Thanks for your interest. Talk to you soon. Or maybe not.
-
*Yes, they are really just copper plated zinc. But how poetic would that sound?
Friday, June 26, 2009
Saturday, June 6, 2009
Transmission surprise and a new shifter
I got the motor in the '58 running decently. New spark plugs made a world of difference. I have not even checked under the distributor cap yet, it could probably use a new set of points (this is OLD technology) and some other stuff, but it's running ok for now, so we'll explore that all of that later. Since I now have brakes, I could move on to getting the car to drive.
-
The automatic transmission would only shift into forward, I either could not find reverse, or reverse is not working. Not good. I did a quick inspection of the stock column shift linkage, and found it to be all dodgy and worn out. I quickly decided to eliminate it and install a more mechanically direct floor shifter. I began to make a shifter from some random extra parts I had saved from other shifter installs I have done over the years, and some miscellaneous metal materials. All I needed it to do was to move the transmission into the gears, and by mounting a shifter right on the floor, over the transmission, I felt that I could fabricate something that would do the job pretty cheaply. An inspection of the transmission itself yielded a surprising and fortunate find: The transmission is not the archaic stock cast-iron case Powerglide 2-speed, but the more modern and preferable aluminum-case Turbo 350 3-speed! This trans did not come from the factory in this car. This is a swap I was already planning to eventually do, and I happen to have a spare T-350 for just such an occasion.
 This is a Turbo 350. While this model of transmission has not been produced for many years, it is still a very popular install in many mild-performance street cars today. It is very well supported by the aftermarket. While I thought I was saddled with the stock transmission in the car, I was not eager to get into a trans swap right away, since I believed I would need a different length driveshaft, which would really mean a new driveshaft, probably a $400 expense. Well, here's a T-350 already in the car, and that sure looks like the stock driveshaft in there too, happy as can be. (By the way, the "Turbo" in Turbo 350 has nothing to do with a turbocharger. The real name for this trans is Turbo-hydromatic 350, and the use of the turbo designation is puzzling to me. Of couse not as puzzling as the shaving razor called "Turbo-something-or-other", which really has nothing to do with a turbocharger, but I digress.)
-
Now I am not so concerned about reverse gear. If the reverse truly is not working, I can easily swap my spare Turbo 350 in there. If I still have problems, it will be worth having one of these transmissions rebuilt, since I will be putting money into a viable transmission choice. I am hoping that the reason the transmission would not work in reverse is because the balky stock shifter was never selecting reverse gear properly. I am now expecting that once the shifter issue is fixed, we will have the joy of reversing.
-
So after all of this, I was still working on my custom shifter fab. I know I could make a useable mechanism, but would this be worth the effort in the end? Since I feel as if I have saved money on the driveshaft I won't have to buy, I decided to splurge and buy a real shifter. But I'm not just looking for justification to spend money on cool parts (as if I have ever needed any), I have good reasons.

This is a Hurst V-matic shifter. This is what I'm getting. Now I did have an accordian-style rubber boot, an aluminum shifter stick, and even a Hurst T-handle to use on my home-made shifter, so I know I could make it look cool, but anything I could make would on it's best day be a far cry from something like this. This shifter has a reverse lock out, to guard against an unintentional shift into reverse. It has a neutral safety switch, to prevent starting the car while in gear (very important!). It has an illuminated gear selection indicator. It has cable operation (I was making a mechanical linkage) for flexibility in mounting position. It would not require cutting up the car floor and splicing new sheet-metal in (my linkage would require this). It is all new, and reasonably priced. My design had none of these advantages, and I had no certainty that it would even work properly. BOOYAH! New shifter. Should be here early this week.
-
Photos: Jegs
-
The automatic transmission would only shift into forward, I either could not find reverse, or reverse is not working. Not good. I did a quick inspection of the stock column shift linkage, and found it to be all dodgy and worn out. I quickly decided to eliminate it and install a more mechanically direct floor shifter. I began to make a shifter from some random extra parts I had saved from other shifter installs I have done over the years, and some miscellaneous metal materials. All I needed it to do was to move the transmission into the gears, and by mounting a shifter right on the floor, over the transmission, I felt that I could fabricate something that would do the job pretty cheaply. An inspection of the transmission itself yielded a surprising and fortunate find: The transmission is not the archaic stock cast-iron case Powerglide 2-speed, but the more modern and preferable aluminum-case Turbo 350 3-speed! This trans did not come from the factory in this car. This is a swap I was already planning to eventually do, and I happen to have a spare T-350 for just such an occasion.
 This is a Turbo 350. While this model of transmission has not been produced for many years, it is still a very popular install in many mild-performance street cars today. It is very well supported by the aftermarket. While I thought I was saddled with the stock transmission in the car, I was not eager to get into a trans swap right away, since I believed I would need a different length driveshaft, which would really mean a new driveshaft, probably a $400 expense. Well, here's a T-350 already in the car, and that sure looks like the stock driveshaft in there too, happy as can be. (By the way, the "Turbo" in Turbo 350 has nothing to do with a turbocharger. The real name for this trans is Turbo-hydromatic 350, and the use of the turbo designation is puzzling to me. Of couse not as puzzling as the shaving razor called "Turbo-something-or-other", which really has nothing to do with a turbocharger, but I digress.)
-
Now I am not so concerned about reverse gear. If the reverse truly is not working, I can easily swap my spare Turbo 350 in there. If I still have problems, it will be worth having one of these transmissions rebuilt, since I will be putting money into a viable transmission choice. I am hoping that the reason the transmission would not work in reverse is because the balky stock shifter was never selecting reverse gear properly. I am now expecting that once the shifter issue is fixed, we will have the joy of reversing.
-
So after all of this, I was still working on my custom shifter fab. I know I could make a useable mechanism, but would this be worth the effort in the end? Since I feel as if I have saved money on the driveshaft I won't have to buy, I decided to splurge and buy a real shifter. But I'm not just looking for justification to spend money on cool parts (as if I have ever needed any), I have good reasons.
This is a Hurst V-matic shifter. This is what I'm getting. Now I did have an accordian-style rubber boot, an aluminum shifter stick, and even a Hurst T-handle to use on my home-made shifter, so I know I could make it look cool, but anything I could make would on it's best day be a far cry from something like this. This shifter has a reverse lock out, to guard against an unintentional shift into reverse. It has a neutral safety switch, to prevent starting the car while in gear (very important!). It has an illuminated gear selection indicator. It has cable operation (I was making a mechanical linkage) for flexibility in mounting position. It would not require cutting up the car floor and splicing new sheet-metal in (my linkage would require this). It is all new, and reasonably priced. My design had none of these advantages, and I had no certainty that it would even work properly. BOOYAH! New shifter. Should be here early this week.
-
Photos: Jegs
Sunday, May 31, 2009
Brake rebuild, new 30 year old mirror
I have been pretty busy doing work on the '58. The brake master cylinder was leaking real bad when I got the car. So basically, no brakes. I have been weighing lots of options for repairing this, most of them centered around upgrading the brake system as well. I was pretty set on going for a brand new front disc brake conversion with a power boosted dual master cylinder. This would be a really fantastic upgrade, but it would run about $500. My last $500. I was about to settle on a new stock master cylinder ($100) when I found a rebuild kit for only $20! 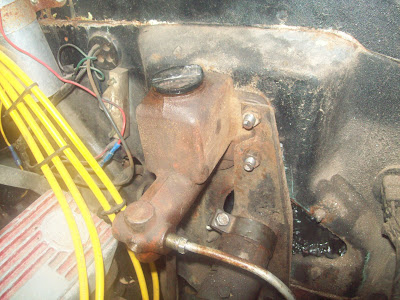 This is the stock master cylinder, rebuilt at home. I disassembled the unit, cleaned it thoroughly, and honed out the bore. I found that the compensating port (sort of a bypass port) was completely clogged and the bore was filled with gooky gunk. I assembled it with new parts, filled it with new fluid, and bled the air out. So far, so good; no leaks. I mounted it back on the car without even repainting it. Two things:
1. People, you can put all the teflon tape you like on the threads of the main brake line fitting (that's it there coming out and going to the right) but THIS WILL DO NOTHING. Brake lines seal by the compression of the cone on the line sealing against a conical seat. The fitting's threads just provide the force to accomplish this, they do not seal anything. This is not house plumbing. The previous owner clearly did not know this.
2. Normally bleeding brakes involves forcing fluid all the way through the lines to expel any air.
In this case, since only the MC was leaking, there should be no air anywhere else in the brake system. The only air should be right at this same fitting. I used a trick I learned from my brother Dave. I left this fitting slightly loose, and had an assistant pump the brake pedal. This forced fluid out of the fitting, but it pushed the air out as well. By catching the forced leak with some rags, we were able to bleed the air out right at this fitting, and we did not have to bleed the entire system. This worked great, and the pedal feels rock hard. I think we have brakes.
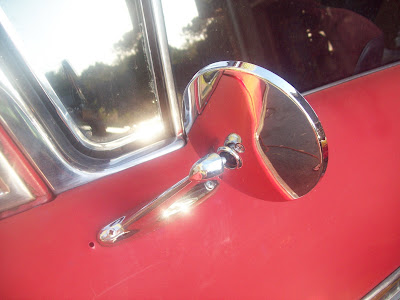 I needed an outside mirror. The reproduction stock ones are expensive, and I'm not sure I like the look of them anyway. I bought this replacement mirror at K-mart about the time I had my first car. I don't know what it was for, since I clearly did not use it on that car. Now I have had it, still in the box, ever since. Didn't think I'd ever use it, so I have dutifully brought it to every swap meet I have ever vended at, and nobody ever bought it, for like five bucks. It must be destiny, so I dug it out and installed it, a brand new, 30 year old, five dollar, K-mart mirror. See, you cannot buy that fun kind of history if you buy a car that already has the mirror on it. I like it. Oh, the extra hole was already there.
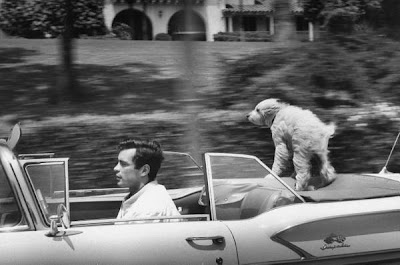
Finally, for no reason, I'll show you this pic of a dog taking a ride on a '58 Impala convertible. Photo: The HAMB, of course.
 This is the stock master cylinder, rebuilt at home. I disassembled the unit, cleaned it thoroughly, and honed out the bore. I found that the compensating port (sort of a bypass port) was completely clogged and the bore was filled with gooky gunk. I assembled it with new parts, filled it with new fluid, and bled the air out. So far, so good; no leaks. I mounted it back on the car without even repainting it. Two things:
1. People, you can put all the teflon tape you like on the threads of the main brake line fitting (that's it there coming out and going to the right) but THIS WILL DO NOTHING. Brake lines seal by the compression of the cone on the line sealing against a conical seat. The fitting's threads just provide the force to accomplish this, they do not seal anything. This is not house plumbing. The previous owner clearly did not know this.
2. Normally bleeding brakes involves forcing fluid all the way through the lines to expel any air.
In this case, since only the MC was leaking, there should be no air anywhere else in the brake system. The only air should be right at this same fitting. I used a trick I learned from my brother Dave. I left this fitting slightly loose, and had an assistant pump the brake pedal. This forced fluid out of the fitting, but it pushed the air out as well. By catching the forced leak with some rags, we were able to bleed the air out right at this fitting, and we did not have to bleed the entire system. This worked great, and the pedal feels rock hard. I think we have brakes.
I needed an outside mirror. The reproduction stock ones are expensive, and I'm not sure I like the look of them anyway. I bought this replacement mirror at K-mart about the time I had my first car. I don't know what it was for, since I clearly did not use it on that car. Now I have had it, still in the box, ever since. Didn't think I'd ever use it, so I have dutifully brought it to every swap meet I have ever vended at, and nobody ever bought it, for like five bucks. It must be destiny, so I dug it out and installed it, a brand new, 30 year old, five dollar, K-mart mirror. See, you cannot buy that fun kind of history if you buy a car that already has the mirror on it. I like it. Oh, the extra hole was already there.Finally, for no reason, I'll show you this pic of a dog taking a ride on a '58 Impala convertible. Photo: The HAMB, of course.
Wednesday, May 20, 2009
Seat install in the '58
 It seemed like a good time to install the front seats in the car. These are used seats from a car I scrapped. They are only temporary; they're in great condition, but are too modern for this car. They are also free.
 I could only get one bolt out of four through the floor and into a clear area underneath. The other three will need nuts welded into the floor. Drill clearance holes through the floor where they will go. I welded nuts onto thick plates that also have holes in them. I had a couple of welds that were not good. They looked like fat blobs just laying on the metal. I ground them off and turned up the heat. Now they are nice and melty looking. You want welds to look melty, because that's what they are; melted (and fused) metal. A small bracket like this will go bright red hot from the heat!
 How hot do you want your welds? Here's a bolt I was using to hold the nut to the plate while welding, and I carelessly tossed it onto my garbage can lid. It melted into the lid and is stuck there. Yes, I use the top of my garbage can as an impromptu workbench.
 I welded the plates over the clearance holes in the floor. This much will do. Incidentally the seat was in and out a dozen times getting and checking the fit. All part of custom fabrication.
 Here's one seat bracket secured, using a small cutoff of round tubing as a vertical spacer.
 One seat in, one to go. It's functional and comfy, and good enough for now. Doing just one seat probably took me 2-3 hours total. There's a lot of fussy fab work, and each corner is different, so they must be fit individually.
 The car did not come with a gas pedal. The stock style is available, but to add a racy flavor, I used this competition style pedal from Moon. It's a beautiful piece, and a pretty easy install. It really is necessary, as it is one of the signature pieces of the car. Tell me that is not totally cool. See, you can't.
 Believe it or not, there was a time before cars came with 100 airbags in them. And before that, there was a time when cars came without seat belts. Really. Of course that was 50 years ago. Since I wanted to add some seat belts to the '58, I furthered the race car vibe with these competition style lap belts. If you're going to add seat belts, make sure you have thick, wide washers installed beneath the floor to resist the bolts from pulling through the comparitively thin floor skin in an accident. I actually welded small washers over much larger washers to achieve this.
 One last thing. I have my excellent wiper arms here, and some brand new reproduction wiper blade assemblies. Well, for what I saved on the arms, I spent to get the blade assemblies; they were $40. They are stainless steel, and what can I say, you just can't go to your local auto parts store for these babies. At least they should last a long time, since I don't plan on abusing the car in bad weather.
 Snap, snap, click, click, and they are done. Simple and neat. Good looking too.
Tuesday, May 12, 2009
Finals week
I have finals this week at college, so my stress meter is pegged. I have been taking a couple of the toughest classes in my major concurrently, since that's the only time they are available, and that has been limiting my time lately, including time for blogging. I knew you would understand.
-
-
The Rhinebeck show was mediocre, and true to form, it eventually rained on us. It's too bad, I have so many good memories of my younger days there, but it has rained on that weekend for probably the last 10 years, so now I almost dread it. Amazingly I did not buy any parts I do not need for a project I do not have. It's a good place to get supplies, like grinding wheels, and sanding discs, etc, pretty cheaply, so that's what I got. I have really been getting the bug lately to get back to my EV project. If you remember, about a year ago I kicked off this blog to document the construction of a battery powered electric vehicle. For various reasons, the project has been temporarily shelved, but the fire still burns within to do this project. Lately I have been convinced that my original idea, a classic truck converted to EV, is still the coolest way to go (better than the buggy). I have had a lot of time to think about this, and the one major thing I would do differently is to start with only a solid cab and doors for a 53-55 Ford pickup. Buying a whole truck in good condition seemed like the way to go last year, but so many body parts for these are available in lightweight fiberglass, that I would rather use them then the heavier original steel parts. By the time I decided on a full frame swap, there was not much of the original truck I really needed. Unfortunately, I have absolutely no funding in place for this, and no prospect of any, anytime soon. Perhaps if someone wanted to offer a no-interest loan, or better yet a grant, that would be great.
 I have really been getting the bug lately to get back to my EV project. If you remember, about a year ago I kicked off this blog to document the construction of a battery powered electric vehicle. For various reasons, the project has been temporarily shelved, but the fire still burns within to do this project. Lately I have been convinced that my original idea, a classic truck converted to EV, is still the coolest way to go (better than the buggy). I have had a lot of time to think about this, and the one major thing I would do differently is to start with only a solid cab and doors for a 53-55 Ford pickup. Buying a whole truck in good condition seemed like the way to go last year, but so many body parts for these are available in lightweight fiberglass, that I would rather use them then the heavier original steel parts. By the time I decided on a full frame swap, there was not much of the original truck I really needed. Unfortunately, I have absolutely no funding in place for this, and no prospect of any, anytime soon. Perhaps if someone wanted to offer a no-interest loan, or better yet a grant, that would be great.
 I have also want to build a new dragster, based upon this 1963 Tony Nancy car. I would do the complete fabrication on this one. I've been hot on this idea for about 6 months now. Again, no funding or reason, it's just a desire.
I hope to get to the '58 Biscayne soon. I plan to spend the last of my car fund on a new brake system for it, since there's no reason to get it driving if I can't get it stopped. I already have this leaky brake master cylinder out of there, just waiting for something better. Unfortunately, that is the lasty-last of my car money, so I hope nothing else big needs replaced.
-
So I've been pretty busy, but not making money, so not much is getting done. At least dreaming about car projects is still free.
Thursday, April 30, 2009
Rhinebeck car show this weekend

The Rhinebeck spring car show and swap meet is this weekend, Friday thru Sunday. This show and swap is the first one I attended on a regular basis, and I still try to attend every year. I vended there for a couple of years, and entered a car in the show one time. I have many fond memories of times I have spent there.
The temperature is supposed to be in the mid-60's, and after some possible light rain Saturday morning, I am sure it will be nice for the rest of the weekend. It's a local show, so there's really no excuse not to attend.
There is a huge car show on Saturday and Sunday, a fantastic swap meet, and don't miss the car corral; a designated area with a wide variety of different whole cars for sale. This is way out back behind the oval track. Insider's tip: if you think a car is priced too high, take down the phone number and call it a week later. I once scored a car at a more reasonable price this way because nobody bought it during the show weekend.
I'll be there Sunday, see you there!
photo: unknown. (People, can we stop putting wacky spacers in our intake systems to make them comically-tall like this? Seriously.)
Sunday, April 26, 2009
A glimse of my insanity.
Here's an example of the kind of insanity I do. Kind of a long one, so get comfortable.
-
I have been using a mechanical fuel injection system with methanol alcohol fuel on my dragster. For a couple of reasons, I have decided to change over (or back, really) to a carburetor and gasoline. Basically, the injector and the alcohol fuel system need a lot more maintenance, so I'm switching. This is the top part of the fuel injector. You can see the injector nozzles and lines near the bottom, these spray the fuel directly into the intake ports. The top part is the air metering scoop, or "hat", and the red butterfly valve plates tilt open and let the air in. The red plates and the openings are very carefully machined and fitted. They, and the rest of the system, are much more sophisticated than they look.
-
This injector is made by a company called Enderle, and this style and look of injector has been in use for probably 40 years. For what it's worth, it has a serious appearance. When a car shows up with one of these, it means business. Yeah, it's part of the allure.
-
Here (below) is the gas carburetor, and a high flow air filter. I love using an air filter. I like the security of knowing no pebbles or debris can get in my engine. Even dust is bad. The only problem, really, is the comparitively pedestrian appearance of this setup. Doesn't exactly scream formidable, does it?
 What to do? What to do, indeed?
 I made this air filter cover/ air scoop out of .030 aluminum sheet. All it really does is cover the filter, and direct incoming air onto the filter. Kind of crude, but the rounded bends are supposed to soften the boxy look. It's supposed to emulate an injector hat made by Crower, but it's kind of big. That's as small as I could make it and still cover the filter. Notice the word emulate, that will be important later. I still really like this, but it still looked boxy to me, so I tried a couple of more ideas.
 Here is a more faceted design model, made of cardboard. The middle shelf would not be in the final design, it's only there for support. I thought the facets, and bent sides would help hide the tall height of the scoop; the filter is 5" tall. I decided this was too complicated, and did not make it in metal.
 Here's a half-scale model I made out of file folder material. I really liked this design, and this material and size made the model more accurate, and easier and faster to build. Doesn't photograph well. And yeah, it kind of looks like a McDonalds large french fry box.
 I did build this one. I modified some of the angles and dimensions to soften it up a little, make it less radical. One nice feature of these aluminum scoops is that the top surface functions as the top filter covering, they sit right on the top of the filter top edge. This keeps the overall height down.
 Here's a rear 3/4 view of the last one. I have this little bench top sheet metal brake (bender). Works good enough for these little projects, I think. Overall, I was pretty happy with this one. It has nice faceting, it tapers towards the rear, it has the nice strengthening bends across the top and bottom of the front opening, and the angled front side openings give it some agressiveness. On the downside, it might be too busy, and I think the overall look is too Star Wars. Not simple enough to fit in with the late '60's early '70's vibe I'm going for.
 Finally, this. (Sigh). This is an air filter housing designed to look like an Enderle injector. Guys buy these and put them on their street cars to give them some of the appeal of a real injection system. But obviously, they're fake. These have all the sophistication of the auto accessory aisle at K-Mart. And I hate fake stuff on cars. I really hate fake stuff on race cars. So, what I did was, I bought this used on ebay, and hollowed out the bottom, and made some sturdy brackets so it would fit over the air filter, and well, there you have it. You can see the air filter poking out at the bottom a little, but I don't care about that. Yes, I made a rod from the carburetor linkage so the butterfly plates open as you push the throttle pedal. Good grief, what have I come to?
-
I have been using a mechanical fuel injection system with methanol alcohol fuel on my dragster. For a couple of reasons, I have decided to change over (or back, really) to a carburetor and gasoline. Basically, the injector and the alcohol fuel system need a lot more maintenance, so I'm switching.
 This is the top part of the fuel injector. You can see the injector nozzles and lines near the bottom, these spray the fuel directly into the intake ports. The top part is the air metering scoop, or "hat", and the red butterfly valve plates tilt open and let the air in. The red plates and the openings are very carefully machined and fitted. They, and the rest of the system, are much more sophisticated than they look.
-
This injector is made by a company called Enderle, and this style and look of injector has been in use for probably 40 years. For what it's worth, it has a serious appearance. When a car shows up with one of these, it means business. Yeah, it's part of the allure.
-
Here (below) is the gas carburetor, and a high flow air filter. I love using an air filter. I like the security of knowing no pebbles or debris can get in my engine. Even dust is bad. The only problem, really, is the comparitively pedestrian appearance of this setup. Doesn't exactly scream formidable, does it?
 What to do? What to do, indeed?
 I made this air filter cover/ air scoop out of .030 aluminum sheet. All it really does is cover the filter, and direct incoming air onto the filter. Kind of crude, but the rounded bends are supposed to soften the boxy look. It's supposed to emulate an injector hat made by Crower, but it's kind of big. That's as small as I could make it and still cover the filter. Notice the word emulate, that will be important later. I still really like this, but it still looked boxy to me, so I tried a couple of more ideas.
 Here is a more faceted design model, made of cardboard. The middle shelf would not be in the final design, it's only there for support. I thought the facets, and bent sides would help hide the tall height of the scoop; the filter is 5" tall. I decided this was too complicated, and did not make it in metal.
 Here's a half-scale model I made out of file folder material. I really liked this design, and this material and size made the model more accurate, and easier and faster to build. Doesn't photograph well. And yeah, it kind of looks like a McDonalds large french fry box.
 I did build this one. I modified some of the angles and dimensions to soften it up a little, make it less radical. One nice feature of these aluminum scoops is that the top surface functions as the top filter covering, they sit right on the top of the filter top edge. This keeps the overall height down.
 Here's a rear 3/4 view of the last one. I have this little bench top sheet metal brake (bender). Works good enough for these little projects, I think. Overall, I was pretty happy with this one. It has nice faceting, it tapers towards the rear, it has the nice strengthening bends across the top and bottom of the front opening, and the angled front side openings give it some agressiveness. On the downside, it might be too busy, and I think the overall look is too Star Wars. Not simple enough to fit in with the late '60's early '70's vibe I'm going for.
 Finally, this. (Sigh). This is an air filter housing designed to look like an Enderle injector. Guys buy these and put them on their street cars to give them some of the appeal of a real injection system. But obviously, they're fake. These have all the sophistication of the auto accessory aisle at K-Mart. And I hate fake stuff on cars. I really hate fake stuff on race cars. So, what I did was, I bought this used on ebay, and hollowed out the bottom, and made some sturdy brackets so it would fit over the air filter, and well, there you have it. You can see the air filter poking out at the bottom a little, but I don't care about that. Yes, I made a rod from the carburetor linkage so the butterfly plates open as you push the throttle pedal. Good grief, what have I come to?
-
I know this looks the same as the real injector in the photos, but trust me, it's different, and it's fake, and it's junk. But it does get me some of my cool look back, and that was why I did it. Other downsides: It would take longer to get off and on if I have to do any work on the carburetor. It is connected to the throttle linkage, and why connect anything to the throttle linkage if you don't have to? Finally, it is fake. I'm not fooling anyone, least of all myself. Yet people that know me, know I sometimes like to do odd things just to do them. I don't like to take anything too seriously. So maybe it's okay.
-
I'm either going with this fakery, or a better version of the first scoop (3rd photo). Perhaps I'll get the courage to just run the air filter alone (2nd photo). I kind of like the simplicity, purity, and honesty of that.
-
I also found another cardboard model, and of course there were countless sketches. The insanity of this is that I went through all of this, and all of these permutations, and physically made all of these, in only a week's time. I'd be up all night, making sketches. Do this, no I like that, no, I don't like that, how about this, what if this, no, I'll just do something fake. It was crazy, and yet it seemed ordinary to me. It was like I was compelled to do all of this. I couldn't not do it. It's just how I am.
Monday, April 20, 2009
Five Star show
 I went to the show at Five Star Automotive this past Saturday. It worked out pretty well. There was a live band: "Thrown Together", that sounded anything but thrown together. There was free food and drinks; I was happy to have plenty of both.
 Cars of all types were displayed on this decent sized site. There were even a couple of full-race dragsters there. The turnout was generous, but not so big that there was congestion and overcrowding. No judging or trophies, just a chance to hang out casually and see some cars. My photos don't do it justice.
 Regrettably, I have a bit of a cold, so I was not feeling up to par. Since I had been sick for a couple of days, I didn't have a car there as promised, either. I'm still only running on about 7 cylinders, and I have other committments for today, so I'm signing off early.
 Sunday, April 12, 2009
First car show event of the season!
 A friend of mine is having an open house/ car show / social gathering featuring free food, and a live band. This is at the Five Star Automotive repair shop on Route 9 in Wappingers Falls. The date is Saturday, April 18, 2009, from 12-5 pm. This is next weekend, people, so get your rides together.
The owner of the business is putting this on as an informal thank-you to all of his fine customers and neighbors in the community.
This is the first event he will be hosting so we don't really know how it will go, but if you want the chance to hang out with friends, look at cars, and swap stories, all while enjoying free food and live music, this is the place to be next Sunday.
I will be there with some kind of neat car, and I'll to get the word out to my friends as well. Hopefully there will be nice weather.
Please act respectfully and drive safely. We all know what a fast car is, but the public streets and parking lots are not the place to demonstrate this. Thanks, and see you there!
Wednesday, April 1, 2009

Sunday, March 22, 2009
Tech: how to install a motor
I helped my friend install the replacement motor in his Camaro yesterday and today. There are only about 3 tricky parts I had to help him with. No pics today, you will just have to envision this...
-
1. Get the motor into the engine bay and positioned properly. While still hanging from the hoist, you want to have the back face of the motor about 1" forward of the front of the transmission case. You need to get the rear of the motor tilted down about 5-10 degrees. Now make sure that the motor mounts are straddling the frame mounts so they will drop down on them. Get under the car and jack the front of the transmission up until it matches the motor's tilt. Now gently wrestle the motor back onto the trans case, inserting the 5/8" dowel pins on the motor into the mating holes in the trans case. Put the 6 trans to motor bolts in and tighten them up. If you have it right, this will be easy. If it's hard, something is wrong. Back it up and start over. Take the jack out from under the trans, and lower the motor onto the front mounts.
-
2. Get under and attach the converter to the flywheel. Just sayin', so you don't forget this step. Make sure the converter is sitting on there square and nice.
-
3. Install the distributor. Here's how to get the static timing close, so the engine will start. Turn the motor over until cylinder #1 is moving to TDC; top dead center. Turn the motor until the timing mark reaches 12* before TDC, and stop there. This gives us 12* static spark advance. The motor is in firing position. Make a mark on the distributor body where the #1 plug terminal fits onto the body. Remove the distributor cap. Install the distributor so that the rotor comes to point directly at the mark on the distributor when it is fully seated. The motor is now in firing position on the #1 cylinder, and the distributor is in firing position to the #1 cylinder. See how that works?
-
Reinstall the other stuff.
-
My friend's car fired up immediately and ran smoothly right away. The timing on my distributor install was pretty darn close for that to happen! Thank you, thank you.
-
Anyway, he's happy, and I was happy to help. I apologize for no photos, especially since they might have helped my explanations to make more sense. Couldn't find our camera at the time.
Thanks for tuning in. I also have this for you, something I'm selling:
http://cgi.ebay.com/ebaymotors/ws/eBayISAPI.dll?ViewItem&_trksid=p3907.m32&_trkparms=tab%3DSelling&item=150334163068&viewitem=
Any guesses of how high this will go?
-
1. Get the motor into the engine bay and positioned properly. While still hanging from the hoist, you want to have the back face of the motor about 1" forward of the front of the transmission case. You need to get the rear of the motor tilted down about 5-10 degrees. Now make sure that the motor mounts are straddling the frame mounts so they will drop down on them. Get under the car and jack the front of the transmission up until it matches the motor's tilt. Now gently wrestle the motor back onto the trans case, inserting the 5/8" dowel pins on the motor into the mating holes in the trans case. Put the 6 trans to motor bolts in and tighten them up. If you have it right, this will be easy. If it's hard, something is wrong. Back it up and start over. Take the jack out from under the trans, and lower the motor onto the front mounts.
-
2. Get under and attach the converter to the flywheel. Just sayin', so you don't forget this step. Make sure the converter is sitting on there square and nice.
-
3. Install the distributor. Here's how to get the static timing close, so the engine will start. Turn the motor over until cylinder #1 is moving to TDC; top dead center. Turn the motor until the timing mark reaches 12* before TDC, and stop there. This gives us 12* static spark advance. The motor is in firing position. Make a mark on the distributor body where the #1 plug terminal fits onto the body. Remove the distributor cap. Install the distributor so that the rotor comes to point directly at the mark on the distributor when it is fully seated. The motor is now in firing position on the #1 cylinder, and the distributor is in firing position to the #1 cylinder. See how that works?
-
Reinstall the other stuff.
-
My friend's car fired up immediately and ran smoothly right away. The timing on my distributor install was pretty darn close for that to happen! Thank you, thank you.
-
Anyway, he's happy, and I was happy to help. I apologize for no photos, especially since they might have helped my explanations to make more sense. Couldn't find our camera at the time.
Thanks for tuning in. I also have this for you, something I'm selling:
http://cgi.ebay.com/ebaymotors/ws/eBayISAPI.dll?ViewItem&_trksid=p3907.m32&_trkparms=tab%3DSelling&item=150334163068&viewitem=
Any guesses of how high this will go?
Sunday, March 15, 2009
Tech: How to pull a motor (short version).
I helped a friend pull the motor out of his 1971 Chevy Camaro today. He had never done it before, and I have lost count of how many I have done, so I was official advisor. I let him do all the work so he'd have the pride of accomplishment. This is a very simplified version of what to do. It's actually not too difficult. My friend already had the motor ready to come out. Disconnect all the accessories, exhaust, intake, fuel line, radiator, belts, wiring (labelling all the wires), hood off, etc. Take out the front motor mount through bolts. It is not necessary to remove the intake manifold, as he has done here, but he will be swapping it to the new motor later anyway. If you're going to use a chain across the top, like we are, remove the valve covers. Drain as much coolant as you can.
 Other side, you can see the exhaust headers are off and out of the car. Roomy in there now.
 Get underneath, and disconnect the torque converter to flexplate bolts. There are three of them. This is kind of a tough part. It goes way easier if you remove the spark plugs and have the nice flexplate turning tool, which I gladly lent. Push the converter back into the transmission as far as it will go; about 3/8".
 Support the transmission from underneath with a floor jack and a block of wood, like so. Nothing fancy here; block of wood.
 Attach a hydraulic hoist, and begin lifting the motor up. You can see how we used a chain across the top of the motor. The motor will tilt up about 2" in the front, then pull it forward about 1" and it will pull free from the transmission. Boop!
 I'd rather see this than a dead deer on a hook any day. The hot-rodder and his daughter pose with the removed motor. It is, in a sense, that easy.
 My friend already had the motor ready to come out. Disconnect all the accessories, exhaust, intake, fuel line, radiator, belts, wiring (labelling all the wires), hood off, etc. Take out the front motor mount through bolts. It is not necessary to remove the intake manifold, as he has done here, but he will be swapping it to the new motor later anyway. If you're going to use a chain across the top, like we are, remove the valve covers. Drain as much coolant as you can.
 Other side, you can see the exhaust headers are off and out of the car. Roomy in there now.
 Get underneath, and disconnect the torque converter to flexplate bolts. There are three of them. This is kind of a tough part. It goes way easier if you remove the spark plugs and have the nice flexplate turning tool, which I gladly lent. Push the converter back into the transmission as far as it will go; about 3/8".
 Support the transmission from underneath with a floor jack and a block of wood, like so. Nothing fancy here; block of wood.
 Attach a hydraulic hoist, and begin lifting the motor up. You can see how we used a chain across the top of the motor. The motor will tilt up about 2" in the front, then pull it forward about 1" and it will pull free from the transmission. Boop!
 I'd rather see this than a dead deer on a hook any day. The hot-rodder and his daughter pose with the removed motor. It is, in a sense, that easy.
Perhaps I'll do a follow up on the reinstallation, highlighting one or two things to watch out for. It's only marginally more difficult to put a motor back in.
Thanks for tuning in.
Sunday, March 8, 2009
Tech: Alternator swap, part 2 (plus bonus features)
Here's the finishing up of the alternator install. I had to modify the existing generator lower bracket to mount the alternator on it. I welded a piece of metal on it, moving the lower pivot point farther away from the motor.
 If you squint you can see the part in the blurry photo above. No, squint more. That is actually a good weld, it just looks like a little ploop-ploop in this photo.
 I modified the top bracket as well (see the weld). I don't mind the welds showing. Again, the contour of the bracket is better than it looks, and someday I will grind the bracket and paint it nice, and it will look much better. Now is not that day. I just want to get this thing going for now.
 Here's a quickie. A previous owner (henceforth; PO) used a too long, too big spring as a carb return spring, attaching it to the fan shroud. That was only a 50% infraction, but punching a hole in an otherwise unmolested 50-year-old fan shroud with a phillips screwdriver and hammer (I am pointing to the little cross mark) was easily another 50% infraction. Most PO bodges are benign, but this really steamed my vegetables. How cobby. I suppose we are lucky the spring was not longer, or it would be attached to the front bumper. Anyway, a replacement with a proper sized spring, attached to the top of the motor, closer by, solved this problem. No pic. I will undent and weld up the hole when I do the radiator.
 Another worthwhile upgrade: New fuel line from pump to carb. The existing line was a kinked, rusty piece of incorrect size tube, with a big ol' length of hose. Using hose is not the worst thing you could do, but it lacks, shall we say, that certain elegance. I bent up a parts store length of straight tube to fit nicey-nice.
 Here's how you do it, a tubing bender. I have also used old pulleys of various sizes very successfully. If you take your time, it's not so tough.
 New fuel line, topside. Also, new fuel filter. Nothing fancy, a universal type, see-though plastic. If you go for a fancy glass one, it will break someday and spray fuel all over you hot engine, and your car will burn to the ground. That's why I like the plastic ones: cheaper, safer, better.
 Fuel line, pump side. Notice the even, factory style bends. Lower radiator hose removed in this photo.
 If you squint you can see the part in the blurry photo above. No, squint more. That is actually a good weld, it just looks like a little ploop-ploop in this photo.
 I modified the top bracket as well (see the weld). I don't mind the welds showing. Again, the contour of the bracket is better than it looks, and someday I will grind the bracket and paint it nice, and it will look much better. Now is not that day. I just want to get this thing going for now.
-
That's the existing belt on there for now. I'll get a new, shorter one that will put the alternator more in the middle of it's adjustment, and then a second one to keep in the trunk.
 Here's a quickie. A previous owner (henceforth; PO) used a too long, too big spring as a carb return spring, attaching it to the fan shroud. That was only a 50% infraction, but punching a hole in an otherwise unmolested 50-year-old fan shroud with a phillips screwdriver and hammer (I am pointing to the little cross mark) was easily another 50% infraction. Most PO bodges are benign, but this really steamed my vegetables. How cobby. I suppose we are lucky the spring was not longer, or it would be attached to the front bumper. Anyway, a replacement with a proper sized spring, attached to the top of the motor, closer by, solved this problem. No pic. I will undent and weld up the hole when I do the radiator.
  Another worthwhile upgrade: New fuel line from pump to carb. The existing line was a kinked, rusty piece of incorrect size tube, with a big ol' length of hose. Using hose is not the worst thing you could do, but it lacks, shall we say, that certain elegance. I bent up a parts store length of straight tube to fit nicey-nice.
 Here's how you do it, a tubing bender. I have also used old pulleys of various sizes very successfully. If you take your time, it's not so tough.
 New fuel line, topside. Also, new fuel filter. Nothing fancy, a universal type, see-though plastic. If you go for a fancy glass one, it will break someday and spray fuel all over you hot engine, and your car will burn to the ground. That's why I like the plastic ones: cheaper, safer, better.
 Fuel line, pump side. Notice the even, factory style bends. Lower radiator hose removed in this photo.
Last one for today. New battery. Advance Auto Parts actually had '58 Chevys in the computer application database, and they had the correct battery in stock. It was huge, so I'm taking a chance on a smaller, lighter one. Yes, yes, I know, no warranty for you! I later theorized that the huge stockers were necessary because the generators were not as efficient at charging, and since I now have a modern alternator, I can get by with this smaller one. We'll see. I made a sturdy mount, rods, and hold down myself. The rods are still long because I want to make a little non-conductive tray that will gang on top and cover the whole battery. That will be a handy tool tray, and cover the positive terminal of the battery, so wrenches and things don't fall on there and cause a massive short. The alternator feed wire is the red wire poking in from the top left there. Done.
Thanks for tuning in, see you soon.
Friday, February 27, 2009
I have to vent about PCV valves
I will be back with more of the exciting alternator swap later. I haven't finished it yet. But for now, a little diversion based on a question I had from the last post.
One of my readers asked in an email about the function of the odd, nubbin-looking thing on the left, that seems to be leaking oil in this photo:
If you look closely, in the silver and red ribbed cover, there is a protruberance. What this is, is the end of a PCV valve that the previous owner thoughtfully plugged with a vinyl protective cap. Unfortunately, this renders it useless, and crankcase pressure is forcing oil and air out from around it. I will try to give you a simplified lesson in crankcase venting and emission controls relating to them.
-When a combustion engine works, some combustion (power) pressure leaks into the bottom of the engine (the crankcase) where the crank spins around, the pistons go up and down, and all the oil sits, waiting to be pumped around to lubricate everything. This "blowby" is a normal, unavoidable condition, but the air pressure buildup must be relieved, or it will cause the oil gaskets to get pushed out, and you will have huge oil leaks.
-On early cars, up until the late 50's, the venting was done with a tube that came out of the motor, and hung down under the car, and was open to the atmosphere. The air passing beneath the car in motion would help suck the pressure out, and for this reason this is called a "road draft tube". This also left oil mist all over the underside of the car, good for inhibiting rust, but bad for the environment.
-By the 60's, the PCV (Positive Crankcase Ventilation) valve was in use. This is a one way valve that came from the engine crankcase and was plumbed back into the intake, where the pressurized air would be burned up, along with the incoming fuel and air. The name comes from the idea that instead of just letting the pressure force it's way out passively, the PCV system would apply vacuum to positively pull the air/oil vapor out. This was better than just venting it out, but it does have a slight detrimental effect in that it can lead to increased deposits in the combustion chamber and on the valves. We can not make one change to the exclusion of others.
-On modern cars, I believe this pressurized oil mist is probably run into a charcoal cannister first to filter it, then ingested into the intake, minimizing intake contamination.
-The bottom line is that your engine makes internal pressure, and you have to let it out somehow. The owner of my car probably didn't know that the proper thing to do is to run a tube from the PCV valve into the bottom of the air cleaner, and instead just capped it off. We'll tidy this, and more, up later. Now I have to get back to that alternator install.
-If you have any questions, please ask. I will try to explain the basics in a simple fashion.
Sunday, February 22, 2009
Tech: one-wire alternator swap, part 1
 I want to upgrade the charging system in the '58 to an alternator. It came with a generator. A generator makes DC voltage, which is what the car runs on. An alternator makes AC, and then inverts it to DC. I don't know why this is more efficient (I am sure my friend EV-Steve could explain it in a snap) but nonetheless, cars have been using alternators almost exclusively for the last near 50 years, so that's what we're doing. This is a one-wire alternator, so called because it has an internal regulator, so it literally needs just one wire to go from the output lug to the battery positive terminal.
Here's the existing generator in place. I only had about an hour to dedicate to this upgrade, and after taking the generator out, I thought it would be easy to swap the alternator in it's place. I don't know why I thought that. I could see I would have to do some mild modifying of brackets and such, and so the upgrade would take more than one session.

Here's a sneak preview of the new alternator. Oooooh, shiny. More soon.
Subscribe to:
Comments (Atom)

