Sunday, September 30, 2012

A new beginning to the '58 Chevy project.

Well I'm back at it.  A lot has come and gone in the past couple of years, but the end result is I'm back working on the '58 Chevy project.  Lets get right to it. This is the area just in front of the passenger side rear tire.  As you can see, there's not much left.  We'll rebuild it piece by piece.

Looking forward, you can see that most of the "rocker" area structure is gone.  This area makes up most of the structure of the lower body, so it's important to fix it right.

Here I have put in the first piece of new metal.  This horizontal is the new rocker panel base.  Tack welded in place.

Now you make cardboard templates of the pieces you want to add. 
Trace the templates onto 18 gauge sheet steel.  Cut the pieces out and trial fit.  I use this air-powered shear tool.  Works fast and nice.  You'd never be able to cut this metal with hand snips.
Some of the structure tacked in place.  Now we're getting somewhere.
More done.  This point represents a couple hours of work.  Now we'll fix that nasty outer rust hole.
Grind the paint off, and find some good metal to patch to.  Rough cut the hole.  Make the cardboard template.  Cut and form the metal patch.  Trace the patch onto the car and make the final cuts on the car. Here I have sprayed black paint onto the new inside panels, followed by spray undercoating.  Might as well do it now while it's wide open.  Yes you can see right through since the inner panel is missing too.  I'll fix that from the underside later.
Fit the patch panel.  This actually is very time consuming, grinding and fitting each edge to leave the correct gap for welding, but it's all part of the process.  You can see here I have the patch panel all tack welded in.  This is also time consuming, since getting the gaps even and the panel lying flush is critical.  Any step that's poorly done make subsequent steps worse.
This is as far as I got before the rain came, so I packed it up for the day.  That's the basics of it.  Next time we'll finish up the patch, add some filler, and it will look as good as new.

Questions, comments, compliments, or complaints are welcome.  I'll try to have updates every Sunday. Thanks.


Wednesday, June 15, 2011

UPDATE! 2 years later...

I have taken up the EV project again with a new blog, check it out:

http://hudsonvalleyelectricvehicles.blogspot.com/

Friday, June 26, 2009

This might be the end...

...I haven't posted much lately, evidence of my waning interest in the blog. I have already resigned from blogging for the Poughkeepsie Journal. That leaves this blog.
-
The original intent of this blog was to chronicle the build of the electric vehicle; a project, in my mind, worthy and interesting enough to blog about. That got cancelled, or at least put on indefinite hiatus, and I moved onto other, more conventional small projects.
-
I now feel that the blog has lost it's way. I don't think it's particularly interesting, or relevant, or worth reading. My continuing unemployment means I don't have the money I would like to spend on car projects. That's a big show-stopper. I am making excellent progress on my impending career change, but that is a long term endeavor.
-
The car projects I have on hand now are long term projects as well. I do want to get back to the electric vehicle project. I still think this project would be the most unusual and interesting project to write about. I am still very enthusiastic about every aspect of it. I have imagined, over and over, what it would be like to actually drive; what the sensations would be, how it would look, the bright sun glinting off of the metallic green paint. A big, fat, pimped out, truck sized golf cart, zipping down the road, the only sound you would hear is the noise from the tires. I still think it is the right thing at the right time. But again, to do this project decently, I expect it would take possibly $20,000, and I just don't have that kind of dough to invest. I think it could be big. It could become a business. I think it could be the next Boyd Coddington, Jesse James, or OCC. But I never was a big financial risk-taker. Jump off a bridge, yes, I've done that, and worse. But financial risks, no, I'll keep my little copper pennies* right here, thanks.
-
So my point is, speaking of having lost it's way, that I don't know if I'll keep on with the blog. We'll see.
-
For what it's worth, I got the shifter done in the '58, and it works great. I also took the '58 out today for it's maiden voyage up the street and back, and, let's just say it needs a bit more work. But it did drive!
-
Thanks for your interest. Talk to you soon. Or maybe not.
-
*Yes, they are really just copper plated zinc. But how poetic would that sound?

Saturday, June 6, 2009

Transmission surprise and a new shifter

I got the motor in the '58 running decently. New spark plugs made a world of difference. I have not even checked under the distributor cap yet, it could probably use a new set of points (this is OLD technology) and some other stuff, but it's running ok for now, so we'll explore that all of that later. Since I now have brakes, I could move on to getting the car to drive.
-
The automatic transmission would only shift into forward, I either could not find reverse, or reverse is not working. Not good. I did a quick inspection of the stock column shift linkage, and found it to be all dodgy and worn out. I quickly decided to eliminate it and install a more mechanically direct floor shifter. I began to make a shifter from some random extra parts I had saved from other shifter installs I have done over the years, and some miscellaneous metal materials. All I needed it to do was to move the transmission into the gears, and by mounting a shifter right on the floor, over the transmission, I felt that I could fabricate something that would do the job pretty cheaply. An inspection of the transmission itself yielded a surprising and fortunate find: The transmission is not the archaic stock cast-iron case Powerglide 2-speed, but the more modern and preferable aluminum-case Turbo 350 3-speed! This trans did not come from the factory in this car. This is a swap I was already planning to eventually do, and I happen to have a spare T-350 for just such an occasion.

This is a Turbo 350. While this model of transmission has not been produced for many years, it is still a very popular install in many mild-performance street cars today. It is very well supported by the aftermarket. While I thought I was saddled with the stock transmission in the car, I was not eager to get into a trans swap right away, since I believed I would need a different length driveshaft, which would really mean a new driveshaft, probably a $400 expense. Well, here's a T-350 already in the car, and that sure looks like the stock driveshaft in there too, happy as can be. (By the way, the "Turbo" in Turbo 350 has nothing to do with a turbocharger. The real name for this trans is Turbo-hydromatic 350, and the use of the turbo designation is puzzling to me. Of couse not as puzzling as the shaving razor called "Turbo-something-or-other", which really has nothing to do with a turbocharger, but I digress.)
-
Now I am not so concerned about reverse gear. If the reverse truly is not working, I can easily swap my spare Turbo 350 in there. If I still have problems, it will be worth having one of these transmissions rebuilt, since I will be putting money into a viable transmission choice. I am hoping that the reason the transmission would not work in reverse is because the balky stock shifter was never selecting reverse gear properly. I am now expecting that once the shifter issue is fixed, we will have the joy of reversing.
-
So after all of this, I was still working on my custom shifter fab. I know I could make a useable mechanism, but would this be worth the effort in the end? Since I feel as if I have saved money on the driveshaft I won't have to buy, I decided to splurge and buy a real shifter. But I'm not just looking for justification to spend money on cool parts (as if I have ever needed any), I have good reasons.


This is a Hurst V-matic shifter. This is what I'm getting. Now I did have an accordian-style rubber boot, an aluminum shifter stick, and even a Hurst T-handle to use on my home-made shifter, so I know I could make it look cool, but anything I could make would on it's best day be a far cry from something like this. This shifter has a reverse lock out, to guard against an unintentional shift into reverse. It has a neutral safety switch, to prevent starting the car while in gear (very important!). It has an illuminated gear selection indicator. It has cable operation (I was making a mechanical linkage) for flexibility in mounting position. It would not require cutting up the car floor and splicing new sheet-metal in (my linkage would require this). It is all new, and reasonably priced. My design had none of these advantages, and I had no certainty that it would even work properly. BOOYAH! New shifter. Should be here early this week.
-
Photos: Jegs

Sunday, May 31, 2009

Brake rebuild, new 30 year old mirror

I have been pretty busy doing work on the '58. The brake master cylinder was leaking real bad when I got the car. So basically, no brakes. I have been weighing lots of options for repairing this, most of them centered around upgrading the brake system as well. I was pretty set on going for a brand new front disc brake conversion with a power boosted dual master cylinder. This would be a really fantastic upgrade, but it would run about $500. My last $500. I was about to settle on a new stock master cylinder ($100) when I found a rebuild kit for only $20! This is the stock master cylinder, rebuilt at home. I disassembled the unit, cleaned it thoroughly, and honed out the bore. I found that the compensating port (sort of a bypass port) was completely clogged and the bore was filled with gooky gunk. I assembled it with new parts, filled it with new fluid, and bled the air out. So far, so good; no leaks. I mounted it back on the car without even repainting it. Two things:
1. People, you can put all the teflon tape you like on the threads of the main brake line fitting (that's it there coming out and going to the right) but THIS WILL DO NOTHING. Brake lines seal by the compression of the cone on the line sealing against a conical seat. The fitting's threads just provide the force to accomplish this, they do not seal anything. This is not house plumbing. The previous owner clearly did not know this.
2. Normally bleeding brakes involves forcing fluid all the way through the lines to expel any air.
In this case, since only the MC was leaking, there should be no air anywhere else in the brake system. The only air should be right at this same fitting. I used a trick I learned from my brother Dave. I left this fitting slightly loose, and had an assistant pump the brake pedal. This forced fluid out of the fitting, but it pushed the air out as well. By catching the forced leak with some rags, we were able to bleed the air out right at this fitting, and we did not have to bleed the entire system. This worked great, and the pedal feels rock hard. I think we have brakes.

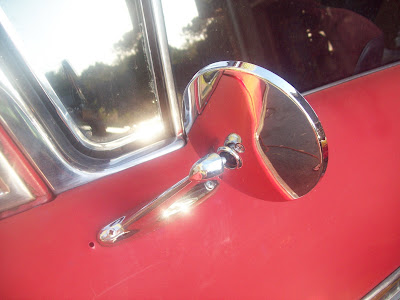
I needed an outside mirror. The reproduction stock ones are expensive, and I'm not sure I like the look of them anyway. I bought this replacement mirror at K-mart about the time I had my first car. I don't know what it was for, since I clearly did not use it on that car. Now I have had it, still in the box, ever since. Didn't think I'd ever use it, so I have dutifully brought it to every swap meet I have ever vended at, and nobody ever bought it, for like five bucks. It must be destiny, so I dug it out and installed it, a brand new, 30 year old, five dollar, K-mart mirror. See, you cannot buy that fun kind of history if you buy a car that already has the mirror on it. I like it. Oh, the extra hole was already there.


Finally, for no reason, I'll show you this pic of a dog taking a ride on a '58 Impala convertible. Photo: The HAMB, of course.

Wednesday, May 20, 2009

Seat install in the '58

It seemed like a good time to install the front seats in the car. These are used seats from a car I scrapped. They are only temporary; they're in great condition, but are too modern for this car. They are also free.
I could only get one bolt out of four through the floor and into a clear area underneath. The other three will need nuts welded into the floor. Drill clearance holes through the floor where they will go. I welded nuts onto thick plates that also have holes in them. I had a couple of welds that were not good. They looked like fat blobs just laying on the metal. I ground them off and turned up the heat. Now they are nice and melty looking. You want welds to look melty, because that's what they are; melted (and fused) metal. A small bracket like this will go bright red hot from the heat!

How hot do you want your welds? Here's a bolt I was using to hold the nut to the plate while welding, and I carelessly tossed it onto my garbage can lid. It melted into the lid and is stuck there. Yes, I use the top of my garbage can as an impromptu workbench.

I welded the plates over the clearance holes in the floor. This much will do. Incidentally the seat was in and out a dozen times getting and checking the fit. All part of custom fabrication.

Here's one seat bracket secured, using a small cutoff of round tubing as a vertical spacer.

One seat in, one to go. It's functional and comfy, and good enough for now. Doing just one seat probably took me 2-3 hours total. There's a lot of fussy fab work, and each corner is different, so they must be fit individually.

The car did not come with a gas pedal. The stock style is available, but to add a racy flavor, I used this competition style pedal from Moon. It's a beautiful piece, and a pretty easy install. It really is necessary, as it is one of the signature pieces of the car. Tell me that is not totally cool. See, you can't.

Believe it or not, there was a time before cars came with 100 airbags in them. And before that, there was a time when cars came without seat belts. Really. Of course that was 50 years ago. Since I wanted to add some seat belts to the '58, I furthered the race car vibe with these competition style lap belts. If you're going to add seat belts, make sure you have thick, wide washers installed beneath the floor to resist the bolts from pulling through the comparitively thin floor skin in an accident. I actually welded small washers over much larger washers to achieve this.

One last thing. I have my excellent wiper arms here, and some brand new reproduction wiper blade assemblies. Well, for what I saved on the arms, I spent to get the blade assemblies; they were $40. They are stainless steel, and what can I say, you just can't go to your local auto parts store for these babies. At least they should last a long time, since I don't plan on abusing the car in bad weather.

Snap, snap, click, click, and they are done. Simple and neat. Good looking too.

Tuesday, May 12, 2009

Finals week

I have finals this week at college, so my stress meter is pegged. I have been taking a couple of the toughest classes in my major concurrently, since that's the only time they are available, and that has been limiting my time lately, including time for blogging. I knew you would understand.
-
The Rhinebeck show was mediocre, and true to form, it eventually rained on us. It's too bad, I have so many good memories of my younger days there, but it has rained on that weekend for probably the last 10 years, so now I almost dread it. Amazingly I did not buy any parts I do not need for a project I do not have. It's a good place to get supplies, like grinding wheels, and sanding discs, etc, pretty cheaply, so that's what I got. I have really been getting the bug lately to get back to my EV project. If you remember, about a year ago I kicked off this blog to document the construction of a battery powered electric vehicle. For various reasons, the project has been temporarily shelved, but the fire still burns within to do this project. Lately I have been convinced that my original idea, a classic truck converted to EV, is still the coolest way to go (better than the buggy). I have had a lot of time to think about this, and the one major thing I would do differently is to start with only a solid cab and doors for a 53-55 Ford pickup. Buying a whole truck in good condition seemed like the way to go last year, but so many body parts for these are available in lightweight fiberglass, that I would rather use them then the heavier original steel parts. By the time I decided on a full frame swap, there was not much of the original truck I really needed. Unfortunately, I have absolutely no funding in place for this, and no prospect of any, anytime soon. Perhaps if someone wanted to offer a no-interest loan, or better yet a grant, that would be great.


I have also want to build a new dragster, based upon this 1963 Tony Nancy car. I would do the complete fabrication on this one. I've been hot on this idea for about 6 months now. Again, no funding or reason, it's just a desire.


I hope to get to the '58 Biscayne soon. I plan to spend the last of my car fund on a new brake system for it, since there's no reason to get it driving if I can't get it stopped. I already have this leaky brake master cylinder out of there, just waiting for something better. Unfortunately, that is the lasty-last of my car money, so I hope nothing else big needs replaced.

-

So I've been pretty busy, but not making money, so not much is getting done. At least dreaming about car projects is still free.