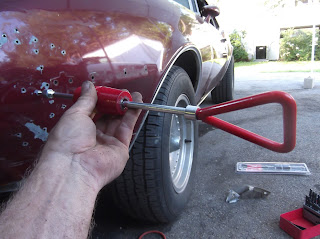
Basically you just drill a hole in the metal, screw in the slide-hammer, and pull the dent out. But dont just drill anywhere. What you want to do is try to imagine how the dent was created, and work the dent out backwards. For example I know the shallow part of the dent above at the right occured last, so I drilled my first hole there. I pulled on it, and then worked my way left-wards across the dent, drilling and pulling. The magic of this method is that as you go along pulling out the shallow edges of the dent, the deep center of the dent keeps moving out shallower and shallower by itself. By the time you get to the center of the dent, its no longer deep, its a shallow as the edges you started with.
Now the once really deep dent is almost all pulled out to near-original contour.
The slide-hammer leaves a small 'volcano' of pulled out metal around each hole. Fortunately, there is just enough room behind the headlight for me to squeeze my hand and a body dolly inside the fender. By using a hammer and dolly (dolly inside the fender, hammer outside) all of the metal is quickly tapped down flush. This is also a good opportunity to use the dolly as a hammer inside the dent to tap out any remaining low spots. Its coming out nicely.
Look how close this is to the original contours. Sure beats hours of battling rusty nuts and bolts.
Here I have welded up all 25 holes with my MIG welder.
Here are all of the welds ground down flush.
Here is final filler being applied.
Here is the repair after final filler sanding and priming. I am very excited to see this in final paint, because I think I did a perfect job on it.
This started as a very daunting dent. I didnt know if I was going to have to buy a new fender, weld in a patch from a used fender, of spend hours pulling the fender completely off to get to the backside.
I took a gamble on a new technique, and I feel that done correctly, this is a real time and money saver, without compromising quality. Sometimes the things you think will be difficult are easy, and the things you think will be easy are difficult.


