Saturday, September 21, 2013

The Doors

Here is typical work needed to repair the rustouts in a door. Here is one outside corner. First I made a cardboard template that defines the door edges, so that after I cut the rust off, I can have some idea of where the door edges were. Basically the whole corner of the door gets cut off. I apply POR-15 rust converter to every inside surface I can. This stops the rusting process by chemical conversion.
Here is the new outer patch welded in place. I had to form the body lines, the drop crease, by hand. This will get filler to finish it off.
Above is the other lower corner of the same door. Same process: make a template, cut out the rust, POR-15 the inside, form a new patch, weld it in.
And it looks like this.
This was a little hiccup. I had the 2 lower corner patches in place, so I rehung the door on the car to check the fit. Unfortunately, despite my template, the edge near the door wasnt right, it was too long. I marked it with a marker to show how much had to be trimmed. Off comes the door again, and I trimmed the door and remade the edge. This is why we trial fit things, if I had found this out later, it would have been even worse to fix.
Above is one inside lower corner after patching. I even put strips of metal along the edges to replicate the folded over part of the outer door skin. Looks factory.
After filler and sanding. You can see the "folded edges" I made.


Here is the other inside corner after patching. WHOA! (I dont know why I dont have 'before' photos for these, sometimes I get so caught up I forget). Anyway, I have to make each individual piece, make sure it is the right shape, angle, and curve, and then tack weld it all together. This was a lot of work, but like all things that are a lot of work, it was very satisfying.
Same area after grinding. I have the 'folded edges' tacked in. Still have to seam weld the edge and finish grind it.


After filler and sanding. Came out perfect! If there is a downside to this work, it is that under normal circumstances, no one will ever see it. It is on the bottom inside of the doors after all. And if they do see it, it will be so well done that they will not suspect that it was repaired. It should look like factory issue.

I dont mind if nobody ever knows it, I will know it, and thats enough.

Monday, September 2, 2013

Yes I really did this


This was either the coolest thing Ive ever done, or the dumbest. Maybe both.


I am doing a body swap. Im taking the cab off of a 72 C30 and putting it onto an S10 chassis I have laying around.


All I could keep thinking of was "Jenga", although this technically was not a Jenga.


Stacked the blocks high enough to roll the existing chassis out. Had to clear the motor. The cab is approximately 5 feet off the ground here.

Here is the body resting on the S10 chassis. Getting the body back down safely was, well, Ill be honest, scary as hell. Lot of block stacking and unstacking.


This might be a future project, although I dont know what direction it will take right now. Im just glad to have the cab back down out of the sky without a major catastrophe.

Sunday, August 25, 2013

68 Firebird; removing a difficult dent

The left front fender of the Firebird has a difficult dent. Its tough to see in this photo but its right behind the front bumper (I couldnt find our camera to take a good close-up shot of it). Removing the bumper and grilles still did not give me good access to the rear of this dent, so I could not just pound it out from behind. I suppose removing the fender completely would be the best solution, but sometimes the best is just not practical. On these older north-eastern cars, the nuts, bolts, and other fasteners are often so rusted, that it literally takes hours to do disassembly. I cant spend 10 hours or whatever just taking a fender off.

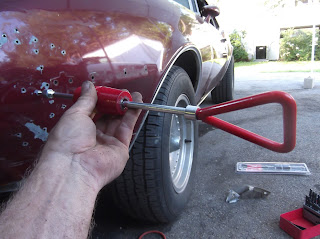
Im going to use a slide-hammer to pull the dent out. I have always considered these kind of a low-class body tool, in fact I didnt even own one until I bought the one you see here to do this job. I figured it would be worth an hours experimentation to see if this was worth persuing.


Basically you just drill a hole in the metal, screw in the slide-hammer, and pull the dent out. But dont just drill anywhere. What you want to do is try to imagine how the dent was created, and work the dent out backwards. For example I know the shallow part of the dent above at the right occured last, so I drilled my first hole there. I pulled on it, and then worked my way left-wards across the dent, drilling and pulling. The magic of this method is that as you go along pulling out the shallow edges of the dent, the deep center of the dent keeps moving out shallower and shallower by itself. By the time you get to the center of the dent, its no longer deep, its a shallow as the edges you started with.

Now the once really deep dent is almost all pulled out to near-original contour.


The slide-hammer leaves a small 'volcano' of pulled out metal around each hole. Fortunately, there is just enough room behind the headlight for me to squeeze my hand and a body dolly inside the fender. By using a hammer and dolly (dolly inside the fender, hammer outside) all of the metal is quickly tapped down flush. This is also a good opportunity to use the dolly as a hammer inside the dent to tap out any remaining low spots. Its coming out nicely.


Look how close this is to the original contours. Sure beats hours of battling rusty nuts and bolts.


Here I have welded up all 25 holes with my MIG welder.


Here are all of the welds ground down flush.


Here is final filler being applied.


Here is the repair after final filler sanding and priming. I am very excited to see this in final paint, because I think I did a perfect job on it. 

This started as a very daunting dent. I didnt know if I was going to have to buy a new fender, weld in a patch from a used fender, of spend hours pulling the fender completely off to get to the backside.

I took a gamble on a new technique, and I feel that done correctly, this is a real time and money saver, without compromising quality. Sometimes the things you think will be difficult are easy, and the things you think will be easy are difficult.

Sunday, July 21, 2013

Your air conditioning is working.

This past week was very hot and humid. We had a lot of people come into the shop complaining that their car air conditioning was not working, or was not working well.

It takes a while for the air conditioning to cool a car down. It isnt immediate. We had one guy that said his AC wasnt working well. First I discovered all of his windows were open about an inch. I hope he wasnt expecting the AC to work well with the windows open. So I closed the windows, and put the AC on. I left a thermometer in the car, and after 15 minutes, it was 50* in the car. I dont know how much better the AC in an 8 year old car is supposed to work, but 50 is pretty cool.

The reason it seems the AC doesnt get really cold on sweltering days is because AC has a tough time cooling when its hot and humid, much like humans do. AC works by (this is simplified) removing the heat from the air in the car and sending it outside. Stand next to the outside part of a working home AC and you will feel that its very hot. The problem is when the AC is trying to put hot air into the outside air that is already very hot and humid.

You know how much hotter you feel when its very humid? You sweat and sweat but you dont feel any cooler? Humid air is air that has a lot of water in it. Your body cools when your sweat evaporates from your skin into the air. But humid air cannot accept the water from your sweat because it is already holding so much water. In hot but dry air your sweat can evaporate easily and this cools you (I saw this explanation on the weather channel).

Your AC works in a similar way (again very simplified). It has a hard time getting rid of heat into heat. So it doesnt work as well.

Theres another factor, and that is the heat of the car. Your car feels the heat too, and the engine radiator is working like crazy trying to get rid of motor heat into hot outside air. The engine compartment is hot like an oven, and unfortunately, the AC heat exchanger is under the hood, RIGHT NEXT TO the blazing hot engine radiator. This is a result of packaging constraints; the AC components need to be located somewhere near the motor. But it doesnt help.

So in summary, its hot. You put on the AC, but ironically, it works less well at the very time you need it to work best. This is probably better explained by the laws of thermodynamics, or the conservation of matter and energy, or something complicated. But your AC is probably really working, even if it seems like it is not.

Friday, July 12, 2013

68 Firebird part 1

New project, a 68 Pontiac Firebird owned by a friend. Oh, this is not it. This is our inspiration photo.


This is the car we will be doing. It looks real straight at first. Just a couple of rust holes and dents.


A little body work and then paint. This is going to be easy.


First thing to do is remove the rear bumper and wheel trim. It was going well until I got to one unyielding bumper bolt inside the trunk. Cant just torch it since its near the gas tank. Finally got it out after about an hour, but I had to cut part of the brace out to do it (we'll fix that later).


I started here. A little rust bubbling, how bad could it be?


I banged on it with my fist, this much came out.


With just a little metal cutting, the hole got this big. Wow.


Here I am pointing to the filler I had to grind out. This car has had work before. No matter, but the filler was at least 3/8" thick! Waaaay too much.


I had to cut out this much to get to firm metal.


Heres the edge of the rear pan. Total junky bodywork. We'll have to fix this later.


I got bitchin' patch panels already. To trim them I use this pneumatic shear. Theres no way these will cut with any hand snips.


Heres another look at the rear pan area. Yes the filler was this thick. To his credit, the previous bodyman did have this all shaped to look like a decent 68 Firebird. He was a real sculpting artist. I figure the entire car will be 3/8" smaller in all directions when I get done with it!


Here is the panel clamped in place. Fitting panels is very fussy and takes a long time to get right. The sheetmetal screws are just temporary. They will be removed and the holes welded up. Time to weld it in.


Here we are after filler (sorry for the fuzzy photo). Nowhere on this panel is the filler more than 1/16". If you do your metal work right, you only need a thin coat of filler. It does usually take a couple of coats of filler though, to get a panel dead straight. This is the correct way.


Top tip: To sand convex surfaces, I use pieces of rubber car tubing with the paper wrapped around it. This gives you a curved surface, and the rubber hose is squishy; it confirms as you sand.

Quick quiz: How much filler do you sand off? Thats right class, almost all of it! There should only be enough filler to smooth over the transitions and fill gentle low spots. If you need more than 1/16", your metal work sucks. Go back and fix it, sanding filler takes just as long as fixing panels, so there no time saving in slopping on the filler.


So here it is: one replacement panel, rust removed, primed, with a minimum of filler. Nice.

Saturday, July 6, 2013

So what did I learn?

Specifically, what did I learn from my ownership of the 58 Biscayne? Maybe some was learned, and some was just confirmation of things I knew, but ignored in the face of buying a car I had really wanted for a long time. My first car was a 64 Biscayne, and my favorite car is a 58 Impala, so I got a 58 Biscayne (58 Impalas were too expensive).

Some of what I learned:
                                    
Never buy a car with a cracked windshield. You cant see it in the photo above, but the 58s windshield is cracked. The windshield replacement was like a huge weight hanging over me, since I didn't trust myself to do it, and I knew it would cost around $500 to have it done. It never got done.


Never cut out the rear wheelwells. The rear wheel lip areas in the body of this car were rusted out, and so while repairing them I reshaped them to have more clearance for wider tires. If you look at the photo above, the original rear wheelwell edge would be down to about the top of the rim top edge. I raised them about 5", and I tried to mimic the front wheelwell shape. I think I did a great job. But for some reason, I was never completely happy with this modification.


Never sell an unpainted car. I concentrated on mechanical issues, so I never got new paint on the 58. If I had finished the body and paint, I could have probably made a lot more on the sale of the car. The paint looks good here, but I had to take pics in the rain one morning, so its just wet.


Never buy a car with an unfinished interior. This didnt bother me when I bought the car, since it would be a chance to do the interior a little custom and cool. But this would have to be farmed out to an upholstery shop, and it would likely cost thousands. The dash was all hacked up in the radio area, and I would have to fix that. Just detailling the interior trim parts and installing all of it (it came in a bundle in the trunk) was a daunting task I wasnt looking forward to.


Even things that 'will be easy' will take time, effort, and some money. Detailing the engine bay is an example. Easy. Also way down a long list of things that just never got done. Youre lucky I dont have any pics of the trunk, it was a disaster. Again, a very fixable disaster, given time, but a disaster nonetheless.

In short, I bought a car that needed too much work. It was all work I could have accomplished if I had more time and/or money. I just dont have as much of either as I used to. Just dont get into a project if you dont have the finances and/or time to see it through. I woefully underestimated (WILLFULLY IGNORED would be more correct) my own finances, time, and patience.

If I work a full week, its 55 hours (!) for about 1/4 of what I used to make. Thats on my feet for 10 hours, doing very physical work. I get home from work and Im dead tired. I have a family, and my young daughter has activities I do not want to miss. Plus it stinks waiting months to spend just a hundred dollars for parts; which I then feel bad about since I make so little. I did not take into account how mentally draining these factors would be over time. Instead of realizing how far I had progressed, all I could think about was how far I had to go. It would be years, and thousands of dollars, and I just got fed up.
This is not the first project I have abandoned, but I do feel like I have given up on a big dream of mine, and thats tough. Of course, I have found that part of growing older is realizing and accepting that some of your dreams will not be realized; and thats just the way it is. Like I said, maybe I will own another 58, and maybe not.


So OF COURSE, just a day or so after the 58 left, Im looking at a hot rod message board I frequent, and somebody posts this:
58 Impala, factory Aztec Bronze color, all jacked up, front bumper removed, ridiculously wide mags and tires...the closest I have ever seen to the original 'Devils Haven' from the Wappingers area, the same car that I was just totally captivated with as a young boy (the acutal DH was way more tasteless, but way cooler to me).
Anyway, a bit of a kick in the nuts there. I not finish my 58; it would never be the 'more mature' version of my inspiration that I had planned. Dang, it hurts, but getting into a decent 58 Impala is $20,000 now, bad economy or not. I hope I know what I am doing.

Wednesday, June 5, 2013

I sold the 58

What can I tell you ladies and gentlemen? The 58 is gone.

I bought the 58 Biscayne some 5 years ago, when the car was 50 years old. I have always held the 58 Chevy to be the ultimate car since I became smitten with a local, hot-rodded 58 Impala when I was some 6-8 years old. It has left an defining mark on me. The original 'Devils Haven', circa 1968.

I bought the 58 as the realization of a dream, or so I thought. The truth is, I found something else. While perusing ebay, I came upon another car I have always wanted. This car was within reach, but I could not have it and the 58 too. The 58 would have required probably another 5 years and thousands more dollars to make it to completion. The other car is a 'done' car. Frankly, I ran out of gas.

I just dont have the income I used to, and as they say, Im not getting any younger. I put the 58 up on ebay and got what I could for it. Fine. Whatever.


Here is the 58 being loaded onto a car carrier, headed for Texas. A very weird event, for sure.


The nice driver, Vladimir (or something) a nice young Russian guy is cinching the car down nice and tight. Funny, that lowered stance is how I wanted the car to sit eventually, and here it is done now.


I took this photo from probably 100 yards away, the 58 turning the corner at the end of my road, and literally the last I saw of it. I will admit to getting a wee bit sad about it.
I feel like I abandoned a friend that was counting on me to help. I feel like this car was counting on me, and I saw a better, younger example, and I just  kicked the 58 to the curb.

But I do think I brought the 58 a long way. I put a lot of parts, money, and time into that car. It really just needed paint and an interior. My hope is that the new owner can bring it along even further, if not to completion. I did the hard work.

I wish it, and its new owner the very best. Perhaps I will own another 58, perhaps not.